Wednesday, October 15, 2008
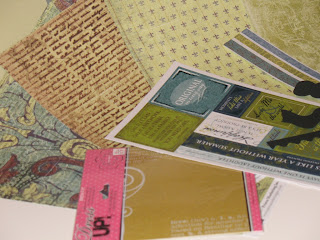
November Kit!!!
Here is our beautiful November kit! This is by far my favorite kit we've done. Here is what is included in this kit:
6 sheets of Prima Cavalier paper ($4.80)
3 sheets of My Little Yellow Bicycle - Vita Bella - Die-Cut Cardstock ($6)
6 sheets of Bazzill cardstock - 2 each of Paris, London, Fresh ($3.30)
4 Prima Cavalier brads ($1.75)
1 Prima Clear Stamp (design will vary) ($1.90)
1 Prima "Dress Up" transparancy - Love ($1.00)
1/4 package Bazzill Just the Edge cardstock - Black (.75)
1/2 pack My Little Yellow Bicycle - Vita Bella - Fresh Verse stickers ($2)
1/2 pack My Little Yellow Bicycle - Vita Bella - Fabric Borders ($2)
1/2 pack Prima Cavalier Ribbon (designs will vary)($3)
Total retail value of this kit - $26.50
Queen Scraps price - $22.50 (15% savings)
I will be putting a PayPal button on the right side of the blog for you purchase this kit!
Best Friends Card
1) Cut out a square piece from the "Cashmere" Bazzill card stock and fold it in half. Then, round the corners. Ink it with black soot distress ink.
2) Cut out a rectangle piece from the "Brilliant White" Bazzill card stock and distress the edges using the scissors distressing technique. Ink it using weathered wood, vintage photo and black soot distress ink.
3) Draw a swirl using a black doodling pen on the right of that rectangle piece and use the "Stitching in Spiral" technique to stitch on it. Add some glitters (Stickles) to it. Paste the rectangle piece in the middle of the card.
4) Use a black doodling pen and doodle some lines at about a third of the rectangular piece.
5) Stitch a big rectangle around the card which overlaps the rectangle piece on it's side edges.
6) To create the flower on the left, cut out a flower using any flower template (just use any normal flowers) from the "All Spice" pattern paper (ink the edges using faded jeans distress ink)and a smaller flower from the "Periwinkle" pattern paper (ink the edges using black soot distress ink). Curl the petals using scissors or twizzer and attach both layers together. Add a big Kaisercraft Adhesive Pearls (included in the kit) in the middle of the flower and add some glitters (Stickles) to it.
7) To create the bigger flower in the middle, cut out a flower using any flower template (just use any normal flowers) from the "Mocha" pattern paper (ink the edges using vintage distress ink)and a smaller flower from the reverse side of the "All Spice" pattern paper (ink the edges using faded jeans distress ink). Curl the petals using scissors or twizzer and attach both layers together. Add a big Kaisercraft Adhesive Pearls (included in the kit) in the middle of the flower and add some glitters (Stickles) to it.
8)To create the small flower in the middle, cut out a flower using any flower template (just use any normal flowers) from the "All Spice" pattern paper (ink the edges using vintage photo distress ink) and curl the petals using scissors or twizzer. Add a big Kaisercraft Adhesive Pearls (included in the kit) in the middle of the flower and add some glitters (Stickles) to it.
9) Lastly, stamp your title of the card on the lower right of the card using black solvent ink.
Sources: October Kit from Queenscraps: Card stock: Bazzill; Pattern Paper: Kaisercraft; Embellishments: Kaisercraft Self Adhesive Pearls; Others not included in the kit: Ranger Distress Ink, Ranger Stickles, Tsukineko Staz On, zig pens, floss for stitching, glue dots and other adhesives.
Stiching Technique
To create this kind of stitching, first you need to draw a swirl or spiral. Then pre-poke your stitching holes with a crafting foam underneath your paper or card stock. Poke your stitching holes along the drawn swirl. Then start stitching. Don't worry about doing perfect zig-zag stitches all the way. For areas which are just too narrow or you need some space for the next zig-zag stitch, just stitch a normal stitch (see how I've stitched on the inner section of the spiral and at some areas of the spiral while I move along). This would actually make the stitching more interesting.
Cherish Card
1) Cut out a rectangle piece from the "Stonewash" Bazzill card stock and fold it in half as the base for the card. Ink the edges using black soot distressing ink.
2) Cut out a negative scallop strip from the "Mocha" pattern paper and ink it with black soot distress ink. Paste it on the left of the card.
3) To cut out various sections of a circle, I've used the "Create your own Circular Template with Sections" technique. I've cut out a half circle from the "Brilliant White" Bazzill card stock using a decorative scissors and ink the edges using faded jeans distress ink. Cut a quarter from the "Mocha" pattern paper using decorative scissors and ink the edges using vintage photo distress ink. Cut another quarter from the "Periwinkle" pattern paper using decorative scissors and ink it with black soot distress ink. Arrange them in a circle as the above pics and paste them down on the card.
4) I've stamped a huge chandelier on the upper left of the circle using black solvent ink and highlight it using Stickles (glitter glue).
5) Cut out two rows of flowers from the reverse side of the "All Spice" pattern paper and ink it using vintage photo distress ink. Paste it using foam adhesive on the lower left and upper right of the card. Add some glitters (Stickles) to it.
6) Stamp the title of the card using black solvent ink on the bottom of the card.
7) Use a black doodling pen and doodle some swirls or flourishes and add some glitters for details.
Love Story
1) Use the reverse side of the "Cinnamon Sugar" pattern paper in the kit as your base for this page. Ink the edges with black soot distress ink.
2) Cut out a huge circle stencil template from scraps. (It's just the negative of a circle masking template). Stenciled the circle using black soot distress ink in the middle slightly towards the left of the page. Use a white doodling pen to draw some circles along the edges and apply some glitter dots (Stickles) to it and around the edges too.
3) Cut out a circle piece from the "Cashmere" Bazzill card stock and distress the edges using the scissors distressing technique. Ink it with black soot and vintage photo distress ink. Layer it over the stenciled circle.
4) Draw another circle in between both layers and use glitters (Stickles), white doodling pen and small circles (use hole puncher to punch out some circles from the "Brilliant White" Bazzill card stock) to dress it up.
5) Cut out a rectangle piece from the reverse side of the "All Spice" pattern paper and ink it with vintage photo distress ink. Paste it under the circles.
6) Cut out a strip with s scallop edge from the "Mocha" pattern paper and ink the edges using black soot distress ink. Paste it to cover the seam between the rectangle piece and the circles.
7) Distress the edges of the photographs using the scissors distressing technique and place it in the middle of the page.
8) Cut out a huge flower from the "All Spice" pattern paper and ink the edges using vintage photo , weathered wood and black soot distress ink. Add some glitter dots (Stickles) for bling and dimensions. Paste it on the lower right of the photograph.
9) Use a chipboard swirl from the American Crafts chipboard accents (included in the kit) and paste it on the upper right of the photograph to give some height to the overall look layout. Add some glitter dots (Stickles) to it for some bling.
10) The flower consist of three layers. Cut out a flower using a template (you can use any normal flowers you have) from the "Mocha" pattern paper for the first layer and ink it with vintage photo distress ink. For the second layer, cut out a flower from the reverse side of the "Periwinkle" pattern paper and ink it with black soot distress ink. For the last layer, cut out a flower from the "Cashmere" Bazzill pattern paper and ink it with black soot distress ink. Curl all the petals using a scissors or twizzer. Attach all three layers together and add a Kaisercarft Self Adhesive Pearl (included in the kit) in the middle of it. Add some glitters (Stickles) to it too. Paste the flower somewhere on the upper right corner of the photograph.
11) Use another chipboard frame from the American Crafts chipboard accents and paste in onto the "Periwinkle" pattern paper and cut it out. Dress it up with four small Kaisercraft self adhesive pearls on each pointed corner of the frame. Paste it on the lower left of the photograph.
12) Apply another Kaisercraft Journaling Spot Rub-on (included in the kit) on the "All Spice" pattern paper and cut it out. Ink the edges with vintage photo distress ink.
13) The word "Love" is actually printed from the computer and cut out. Ink it lightly with pine needles distress ink and attach to the page using some foam adhesives for dimensions. The second part of the title is stamped using black solvent ink.
Sources: October Kit from Queenscraps: Card stock: Bazzill; Pattern Paper: Kaisercraft; Embellishment: Kaisercraft (self adhesive pearls), Kaisercraft Journaling Spot Rub-Ons, American Crafts Chirpboard Accents. Others not included in the kit: Ranger Distress Ink, Ranger Stickles, zig pens, uni-ball signo gel pen, foam adhesive, glue dots and other adhesives.
Beautiful Day
1) Use the "Brilliant White" Bazzill card stock as the base for this page. Ink the edges with faded jeans distress ink.
2) Cut out a rectangle frame from the reverse side of the "Periwinkle" pattern paper and ink the edges using faded jean distress ink. Paste it towards the left in the middle of the page.
3) Cut another rectangle piece (same in length with the rectangle frame above) from the "Periwinkle" pattern paper and ink the edges with weathered wood distress ink. Paste it in the middle of the rectangle frame.
4) Ink the gab on the right between the photograph and the frame with mixture of faded jeans and weathered wood distress ink. Stamp a long border of flourishes with embossing ink on it and heat emboss it with some silver embossing powder. (You don't need a long border stamp to do this. Just stamp the border twice to create a long border)
5) Use any die cut card stock or pattern paper to trace the shape to the "Periwinkle" pattern paper. (Tip: you can absolutely use any decorative edges punchers or designs to do this.) Cut it out and punch some holes along the edge. Ink it with black soot distress ink and doodle it with a black pen. I've also added some glitters (Stickles) along the edge. Paste it right beside with the rectangle frame.
6) Use the negative from step (5) and turn it around to reveal the reverse side of the "Periwinkle" pattern paper. Ink it with black soot distress ink and paste it with a small gap between the two shaped edges.
7) Hand stitch some cross stitches around the rectangle frame.
8) Distress your photograph using the scissors distressing technique. I've added some glitter dots (Stickles) and some small Kaisercraft self adhesive pearls (included in the kit) on the lower left of the photograph. Attach it on the rectangle strip.
9) Add an American Crafts chipboard accents photo corner (included in the kit) on the upper left corner of the photograph. Doodle some glitter dots (Stickles) on it for some bling.
10) Apply a Kaisercraft Journaling Spot Rub-ons (included in the kit) to the "All Spice" pattern paper and cut it out suing a decorative scissors. Ink the edges using black soot distress ink. Paste it on the lower right corner of the photograph.
11) The flower consist of various layers. Use a circular scallop frame from the American Crafts chipboard accents as the base for the flower. Trace a flower template (it can be your regular flower) onto the reverse side of the "All Spice" pattern and cut it out. Ink the edges with vintage photo distress ink. For the upper layer, trace a flower template onto the "Cashmere" Bazzill card stock and cut it out. Ink the edges using black soot distress ink. Curl the petals of both layers of flower using your scissors or twizzer and attach them together. Add a huge Kaisercraft Self Adhesive Pearl in the middle of it and add some glitters (Stickles) to it.
12) Use a black pen and doodle a stem for the flower. Add some chipboard leaves and flourishes included in the kit to the sides of the stem. Add some glitters on them too.
13) Cut out some scrolls from the Queen & Co. Felt Scrolls (included in the kit) and layer them underneath the stem. Add some glitters to them.
14) Lastly, use the Kaisercraft Alphas Rub-on to add your title to the page.
Hope you all like this layout.
Sources: October Kit from Queenscraps: Card stock: Bazzill; Pattern Paper: Kaisercraft; Embellishment: Kaisercraft (self adhesive pearls), Kaisercraft Journaling Spot Rub-Ons, Kaisercraft Alpha Rub-ons, Queen & Co Felt Scroll, American Crafts Chipboard Accents. Others not included in the kit: Ranger Distress Ink, Autumn Leaves Stamp, Ranger Stickles, zig pens, Ranger Embossing Ink, Embossing powders, floss for stitching, foam adhesive, glue dots and other adhesives.
Hug Me
This is Irene's first project with the October kit. Links to her techniques used on this layout will be listed at the end!
1) Use the "Stonewash" Bazzill card stock as the back ground of the page. Ink the edges using weathered wood distress ink.
2) From the left, first cut out a rectangle piece from the reverse side of the "Mocha" pattern paper. Distress the edges using the scissors distressing technique and ink the edges using black soot distress ink. Paste it on the upper left of the page.
3) Cut out a square piece from the "Periwinkle" pattern paper and distress it using the scissors distressing technique. Ink it with weathered wood distress ink. Paste it with a gab under the rectangle piece.
4) Cut out a rectangle piece from the reverse side of the "All Spice" pattern paper and repeat the distressing technique. Ink it with weathered wood distress ink. Paste it with a gab under the square piece.
5) Cut out a square piece from the "Mocha" pattern paper and repeat the distressing technique. Ink it with black soot distress ink. Paste it with a larger gab under the rectangle piece.
6) Distress your photograph with the scissor distressing technique and ink the edges using black soot distress ink. I've cut a small square out from the upper right of the photograph and ink the cut out edges with black soot distress ink. Paste the photograph in the middle of the page.
7) Now, moving on to the right side, first cut out a square piece from the "Mocha" pattern paper and distress it using the scissors distressing technique. Ink the edges with black soot distress ink.
8) Cut out a square piece from the reverse side of the "Mocha" pattern paper and repeat the distressing technique. Ink it with black soot distress ink. Paste it with a gab under the square piece.
9) Cut out another square piece from "All Spice" pattern paper and repeat the distressing technique. Ink it with weathered wood distress ink and paste it with a gab under the square piece above.
10) I've cut out a strip from the "Cashmere" Bazzill card stock and punch some holes in the middle of it. I've inked the edges using black soot distress ink and paste it horizontally at the bottom of the page.
11) Now moving onto the fun part. Create a huge circle masking template from any scraps and mask a huge circle in the middle of the page using weathered wood distress ink. Then, use the "Net Stitching" technique to stitch around the circle.
12) Cut out a strip of the Queen and Co. felt scroll which is included in the kit and paste it on top of the strip of pattern paper on the left. Add some small Kaisercraft Self Adhesive Pearls (Denim) (included in the kit) on part of the felt scroll to add some details to it. This strip will give the page a grounded look.
13) Use the journaling stamp included in the kit, to stamp on the "Periwinkle" pattern paper using a black solvent ink and cut it out using a decorative scissors. Ink the edges using black soot and paste it on the lower right of the page.
14) Ink the edges of the Kaisercraft Wooden Curl (included in the kit) with black soot distress ink and paste it on the upper right of the photograph.
15) Use a large and a small Heidi Swapp Felt Flowers (Brown) included in the kit to embellish around the wooden curl. Cut out a small and medium circle from the "Mocha" pattern paper to layer in the middle of the flower using some foam adhesives. Add a Kaisercraft Self Adhesive Pearls in the center of each circle.
16) Lastly, just use the Kaisercraft Alpha Rub-ons to add your title at the bottom of the page.
This is a very simple page that I think everyone would enjoy creating. Have fun!
Sources: October Kit from Queenscraps: Card stock: Bazzill; Pattern Paper: Kaisercraft; Embellishment: Kaisercraft (self adhesive pearls), Kaisercraft Wooden Curl, Heidi Swapp Felt Flowers, journaling stamp, Kaisercraft Alpha Rub-ons, Quuen & Co Felt Scroll. Others not included in the kit: Ranger Distress Ink, zig pens, Tsukineko Staz On, floss for stitching, foam adhesive and other adhesives.
Subscribe to:
Posts (Atom)